Welcome to the latest update from Layers.app, where we’re continuously evolving to meet the needs of the 3D printing community. In this release, we’re excited to introduce several new features and improvements designed to streamline your workflow and enhance communication.
Manual Quotation Feature
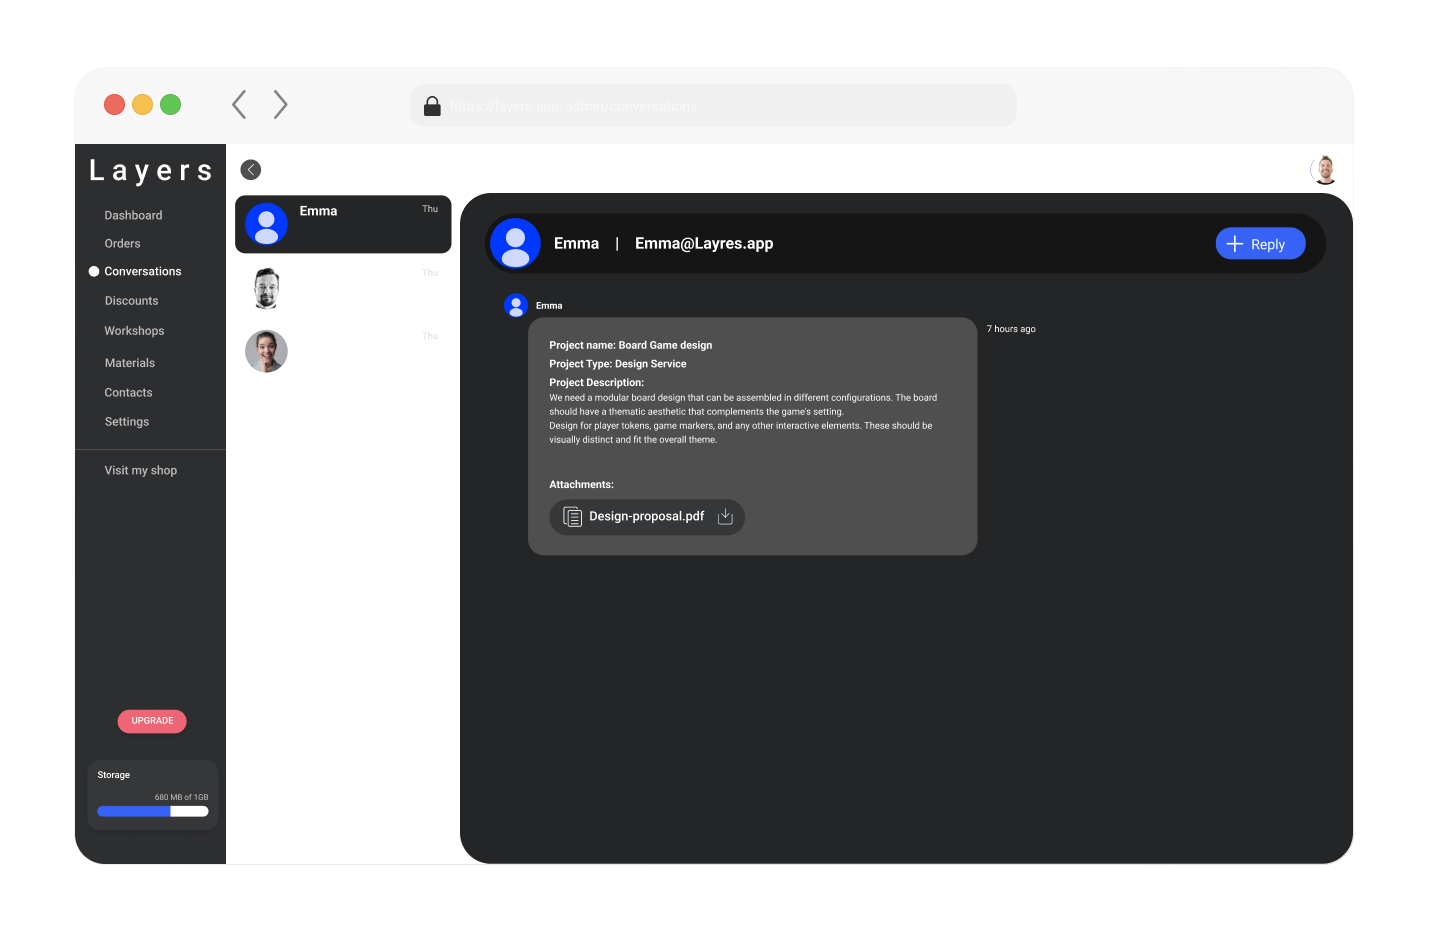
Many 3D printing service customers lack 3D models and require additional services such as 3D design or 3D scanning. Studies show that 20-50% of 3D printing customers fall into this category. Additionally, some 3D printing services prefer not to accept orders without accurate assessments of the 3D model to ensure its printability. In the new version of Layers.app, customers can either upload their 3D model to receive an online automatic price quotation or fill in a price request form to send an inquiry for a quotation. Filled forms can now be received in the newly added “Conversation” section on the admin side.
This enhancement not only improves the customer conversion rate but also empowers workshops to generate new online leads through Layers.app.
File Error and Failed Print can be handled from now-on
In July 2024, we introduced another important feature that enhances the communication between workshops, customers, and admins. This new capability allows workshops to change the order status to “File Error” or “Failed Print.” By doing so, workshops can effectively inform both customers and admins about issues related to the 3D model files or printing failures. This transparent communication ensures that all parties are aware of any problems that arise, facilitating quicker resolutions and improving overall service quality.
Enhancements and bug fixing
One of the highly requested features was the ability to clone materials. This feature has been added to Layers in this update, allowing you to duplicate your materials or colors along with all their inherited settings. This is a significant time-saver, especially during the onboarding process.
This month, we also revamped the search feature on the admin side, enhancing the functionality for both order searches and user searches.
Your Input Matters: Tell Us What You Think
As we roll out these exciting new features, we want to hear from you! Your feedback is invaluable in helping us continue to enhance Layers.app and tailor our updates to your needs. Whether it’s sharing your experience with the new Manual Quotation Feature, how the File Error and Failed Print management impacts your workflow, or suggestions for further improvements, we encourage you to reach out.
Please don’t hesitate to provide your thoughts or submit feature requests. We welcome your input and are dedicated to making Layers.app the best tool for your 3D printing needs. Thank you for being a part of our community and for helping us shape the future of 3D printing solutions.
In this new update, we’ve added many features that our users and customers highly requested. The ability to upload different 3D formats, quantity discount (tier pricing), and numerous bug fixes are major changes that have been added to Layers.app.
Rich 3D Format Support
Users can now upload a variety of 3D file formats, enhancing the flexibility and usability of our application for different types of 3D projects. This feature supports a wide range of popular formats, ensuring that you can work seamlessly with your preferred 3D models:
.STL: Commonly used for 3D printing, the STL (Stereolithography) format is supported, allowing precise and high-quality printing preparations.
.OBJ: The OBJ format, known for its versatility and ability to store complex models with texture information, is now fully supported.
.STEP (.stp): For those in engineering and CAD design, the STEP format enables the exchange of data between different CAD systems.
.IGES (.igs): Another essential format for CAD users, IGES support ensures that you can import and export your detailed models with ease.
.3MF: The 3MF (3D Manufacturing Format) is designed for modern 3D printing applications, offering more detailed model information.
.3DS: The 3DS format, popular in 3D modeling and animation, is supported, making it easier to incorporate detailed and animated models.
.PLY: The Polygon File Format, often used for 3D scanning, is now supported, enabling high-quality 3D scans to be imported directly.
.OFF: The Object File Format, used for storing geometric data, is included, supporting a variety of scientific and educational applications.
.GLB: The GLB (Binary glTF) format, known for its efficiency in transmitting 3D models over the web, is fully supported.
.ZIP: For convenience, you can now upload ZIP files containing multiple models, streamlining the process of managing and importing complex projects.
These enhancements make it easier than ever to bring your existing 3D assets into Layers.app, regardless of the file format.
This new feature is available on both the admin and customer sides of the product. It is accessible to users on the Free, Business, and Enterprise plans.
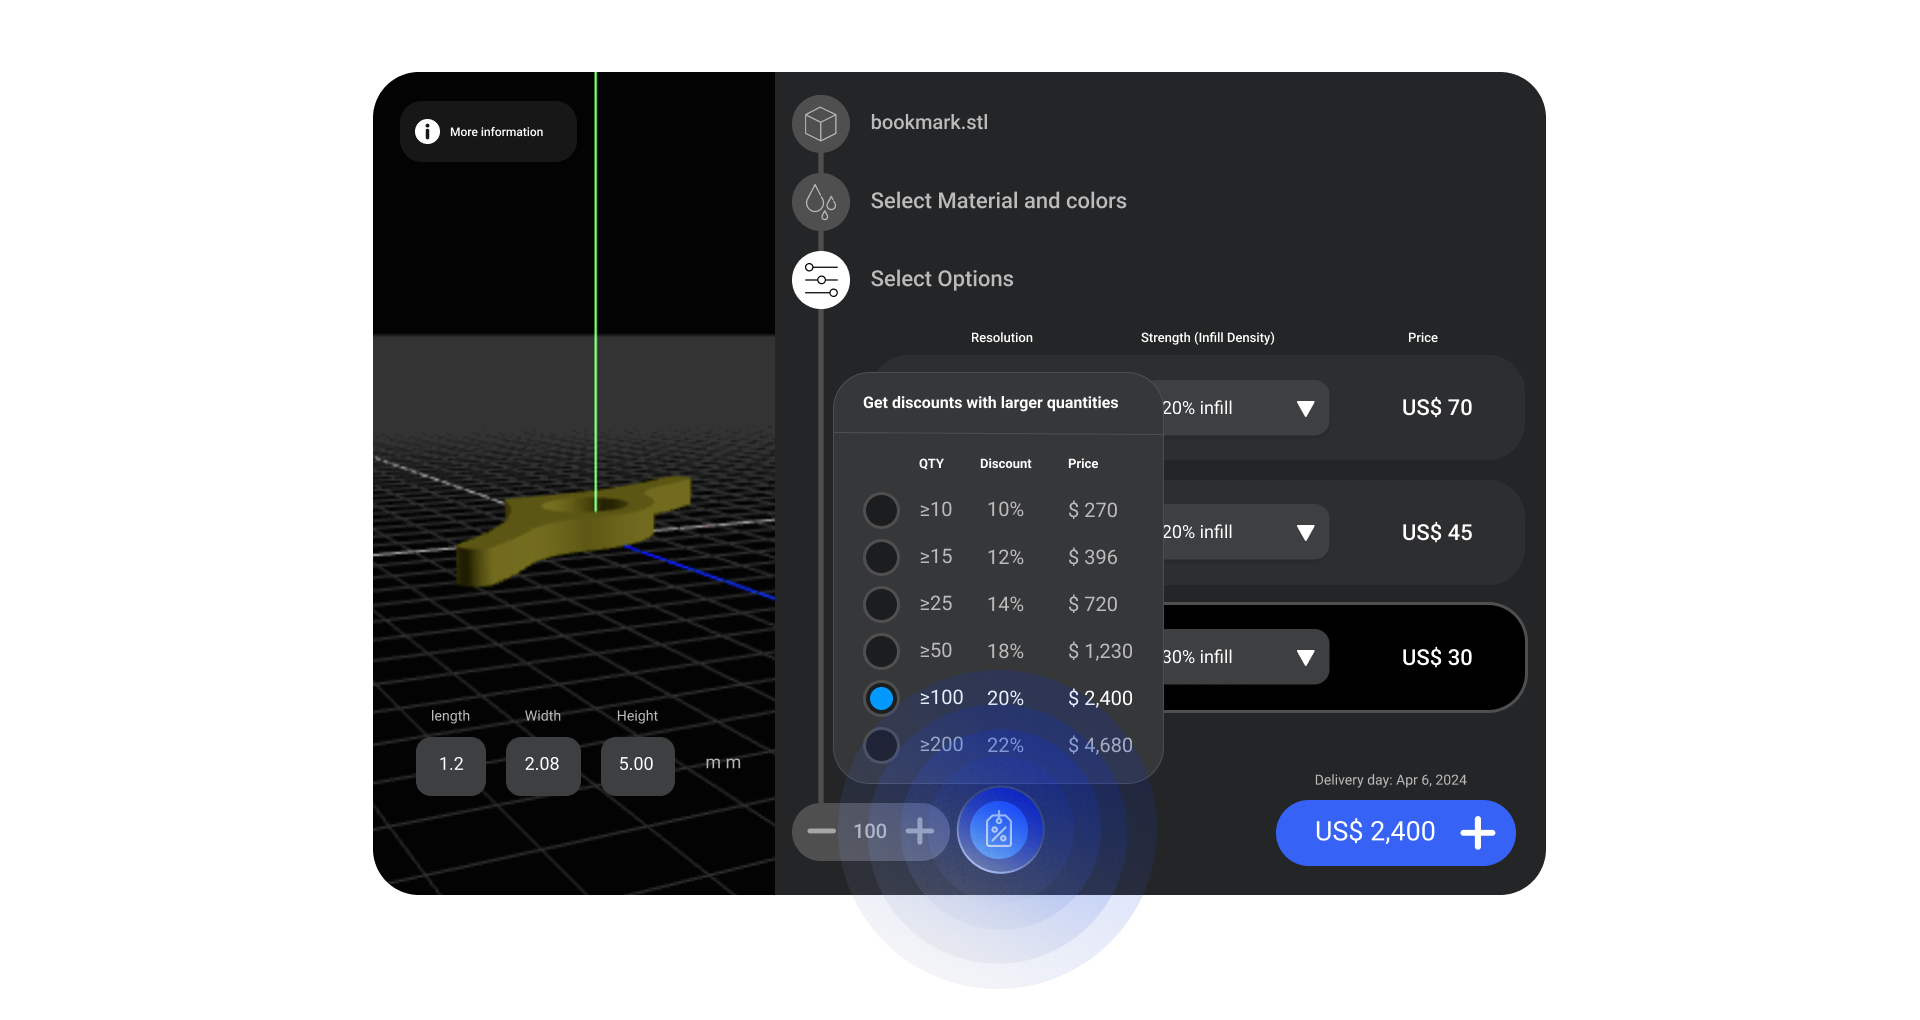
Tier pricing in 3D printing service
In the 3D printing industry, tier pricing is not just a pricing strategy; it’s a vital component of business operations that addresses the unique dynamics of this market. Many clients, especially in industries like manufacturing, engineering, and healthcare, require large quantities of printed parts. Tier pricing makes it feasible for these clients to choose 3D printing over traditional manufacturing methods.
In the new version of Layers.app you can handle quantity discounts for each material and color. By using this feature, you can inform your customers about the discounts available based on the quantity of specific materials they purchase.
This feature is available on both the admin and customer sides and is included in the Free, Business, and Enterprise plans.
The default theme for your 3D shop
Ensuring consistency between the 3D printing service website and the ordering platform is a crucial aspect of branding for a 3D printing business. To enhance this consistency, we’ve introduced a new feature that allows an admin to select a default dark or light theme for the shop.
Bug fixes
Download 3D Models with Original Name: We have resolved an issue where downloaded 3D models would not retain their original filenames. Now, all models will be downloaded with their original names, ensuring better organization and traceability for users.
Stripe Bug Fix in Iframe: Fixed an issue where the Stripe payment processing iframe was not functioning correctly. This fix ensures that all transactions are processed smoothly and securely without errors.
Edited Price in PDF: Corrected a bug where edited prices were not reflected correctly in the generated PDF documents. This ensures that all price adjustments are accurately captured and displayed in your documentation.
Tax Enhancement: Enhanced the tax calculation feature to provide more accurate and detailed tax breakdowns. This improvement helps users better understand their tax liabilities and ensures compliance with local tax regulations.
The latest update, V1.10.1, primarily centered on eliminating various glitches and bugs within the product. This update brings several enhancements, including the option to include a tax code on the PDF invoice, the ability to delete created roles in the roll and permission section, as well as a refactoring of the roll and permission functionalities. Additionally, performance improvements have been made to the automatic invoicing system.
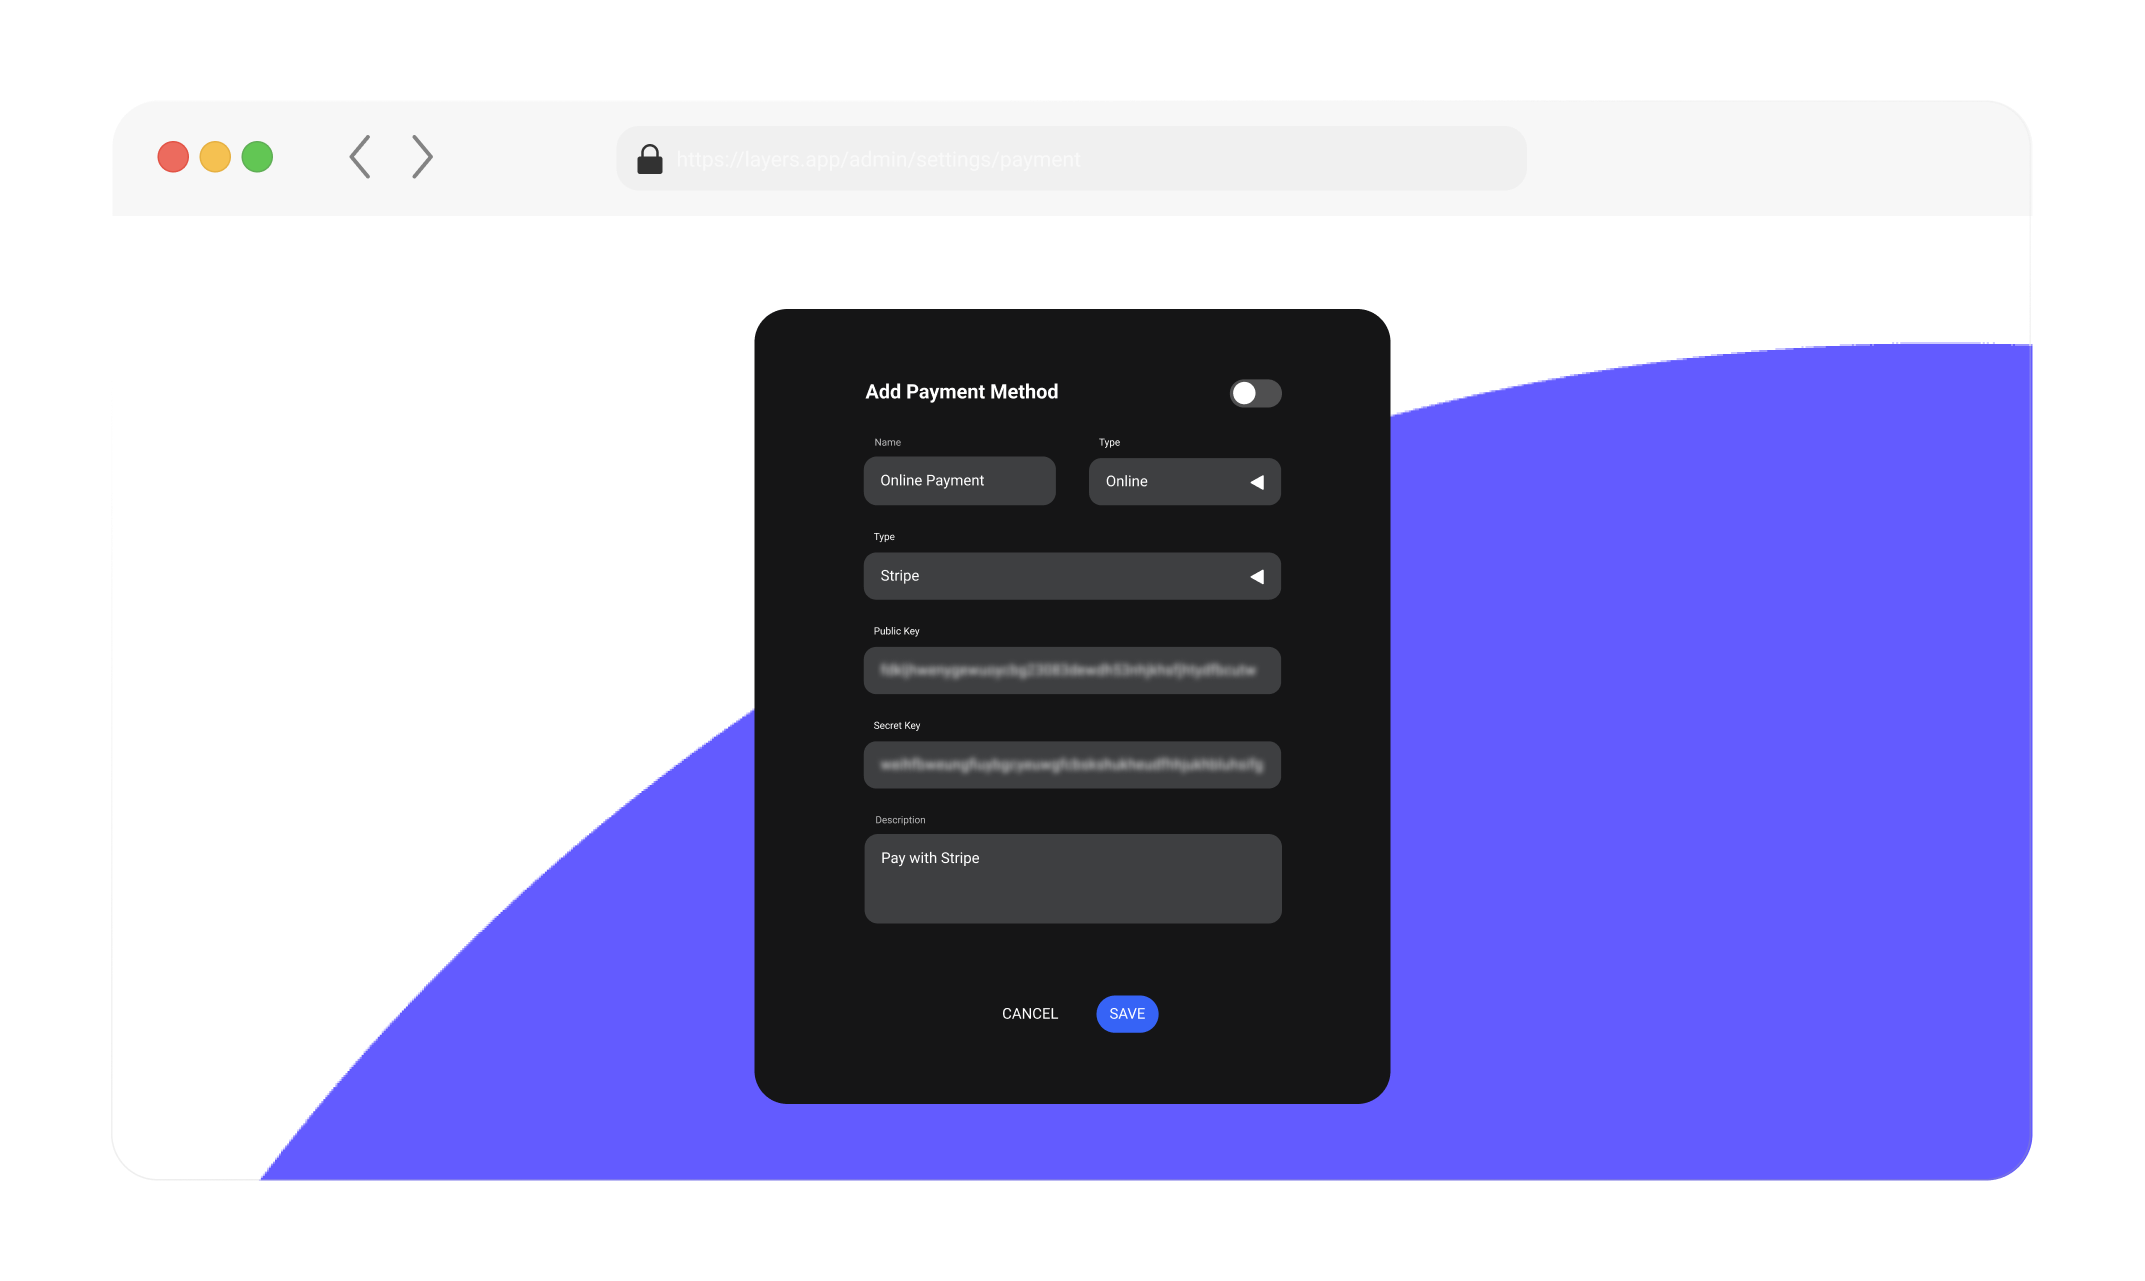
Stripe Integration
In our latest update (V1.10.1), we’ve fundamentally refactored the Stripe Integration, addressing numerous bug reports regarding transaction errors and 3D security problems. We sincerely apologize for any inconvenience this may have caused. Our team has dedicated significant effort to improving this crucial integration for seamless shop functionality. Your feedback on working with Stripe is highly valued, and we would greatly appreciate any insights you can provide.
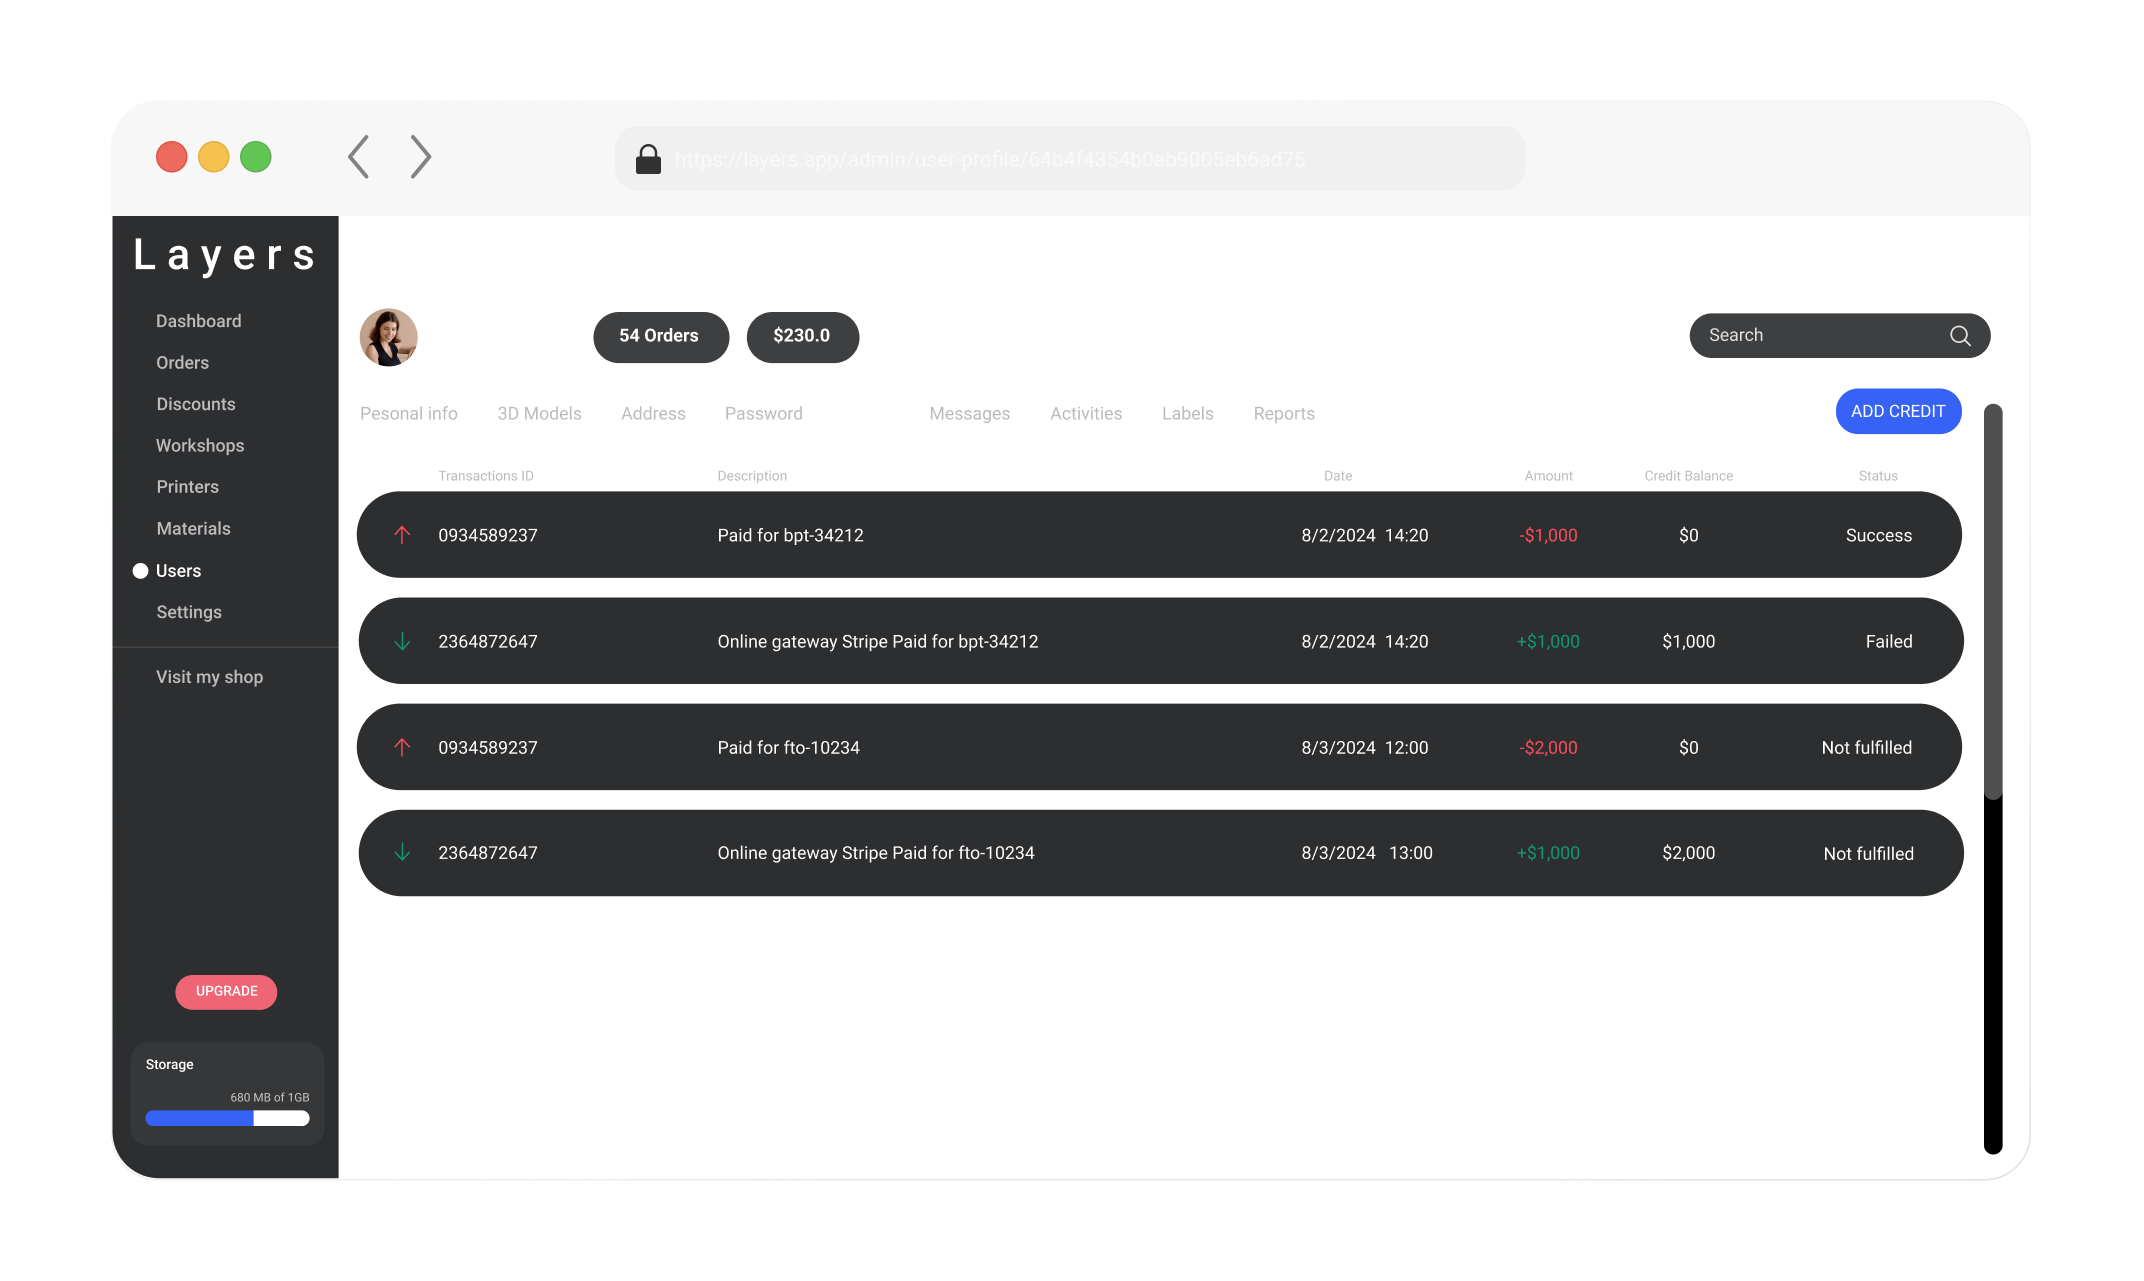
Credit System
Payment options are a critical aspect of the user experience for 3D printing services. Our UX team’s analysis of customer reviews reveals a key trend: many customers prefer to split their payments into two or more installments. Ideally, they’d like the final payment to occur after receiving and inspecting the product for quality. This preference, however, creates challenges in managing payments and ensuring accurate transactions.
We’ve implemented a credit system designed to revolutionize payment flexibility for your 3D printing service. This layered system revolves around user wallets that can be topped up, depleted based on order value, and even managed directly by you, the shop owner.
Here’s how it works: Each user has a dedicated wallet within our platform. When placing an order, users can choose to pay with their existing credit balance, top up their wallet for the specific order amount, or utilize a combination of both approaches. This system offers greater control for both you and your customers. Additionally, you have the power to add or subtract credit from individual user wallets as needed, allowing you to manage credit as desired.
One of the notable additions in this update is the enhancement of payment-related functionalities, particularly the introduction of the Transactions and Credit sections. With this update, you can leverage your shop’s credit system to streamline payments for your 3D printing service orders. Easily track your users’ transactions, top up their wallets with credit, and efficiently manage intricate multiple payments—a necessity in the manufacturing sector.
Other enhancements
This update brings several enhancements, including the option to include a tax code on the PDF invoice, the ability to delete created roles in the role and permission section, as well as a refactoring of the roll and permission functionalities. Additionally, performance improvements have been made to the automatic invoicing system.
We’ve got some awesome updates to share that’ll make your 3d printing experience even smoother. We’re talking accurate FDM cost estimates, easier invoicing, and improved communication – all rolled into one! Get ready to level up your printing game!
Precise 3D Printing Service Quotes with Infill Control
We’re excited to announce infill percentage control, a highly requested feature by our active users! This empowers both admins and customers to achieve accurate price quotations for FDM (Fused Deposition Modeling) 3D prints.
Admins: Set precise infill percentages for models, ensuring consistent pricing and material usage.
Customers: Calculate estimated print costs based on your preferred infill density before placing an order.
This update brings transparency and control to the FDM printing process for everyone involved.
Streamlined Invoicing and Order Sharing:
Generate PDF invoices with a single click! Admins can now easily create professional invoices for specific orders, ensuring clear communication with customers. To generate a PDF invoice:
scroll to the “PDF Invoice” section and click on the “Generate PDF invoice” button:
Sharing just got simpler. Sharing is now simpler than ever. Each order has a unique address that can be seen in the address bar by opening the order. Admins can send a unique Invoice URL to customers or colleagues, granting them easy access to order details.
The Layers.app team is a passionate bunch, and we’re constantly striving to improve the platform based on your valuable feedback. So, Let us know what you think of these new features, and feel free to share any suggestions you might have.
In the meantime, we hope you enjoy the newfound control and streamlined communication these updates bring. Happy printing!
3D printer slicing software is a program that converts 3D models into instructions that a 3D printer can understand. This software is essential for 3D printing, as it allows you to control the print settings, such as the layer height, infill density, and print speed. It also allows you to add support structures to your models, which can help to prevent them from failing during printing.
There are many different 3D printer slicing software programs available, both free and commercial. Some of the most popular programs include Cura, Slic3r, and Simplify3D. Each program has its own strengths and weaknesses, so it is important to choose one that is right for you and your printer.
In this article, we will compare two of the most popular 3D printer slicing software programs: Cura and PrusaSlicer. We will discuss the features of each program, as well as their pros and cons. We will also provide some tips on how to choose the right program for your needs.
Slicers are an essential part of the 3D printing process. Without a slicer, it would be impossible to print 3D models. Slicers allow you to control the print settings, such as the layer height, infill density, and print speed. They also allow you to add support structures to your models, which can help to prevent them from failing during printing.
There are many different 3D printer slicers available, both free and commercial. Some of the most popular slicers include Cura, Slic3r, and Simplify3D. Each slicer has its own strengths and weaknesses, so it is important to choose one that is right for you and your printer.
cura slicer vs prusaslicer
Cura is a free and open-source slicer developed by Ultimaker. It’s one of the most popular slicers available, and for good reason. Cura is easy to use, even for beginners, and it offers a wide range of features and settings.
One of the things that makes Cura so popular is its user interface. The interface is clean and well-organized, and it’s easy to find the settings you need. Cura also has a number of helpful tutorials and guides available, so you can learn how to use it even if you’re new to 3D printing.
In terms of features, Cura offers a lot to choose from. You can adjust the print settings for everything from the layer height to the infill density. Cura also supports a variety of different 3D printer types, so you can be sure that it will work with your printer.
PrusaSlicer is another free and open-source slicer, developed by Prusa Research. Like Cura, PrusaSlicer is easy to use and offers a wide range of features.
One of the things that set PrusaSlicer apart is its support for Prusa printers. If you own a Prusa printer, PrusaSlicer is the perfect slicer for you. It offers a number of features that are specifically designed for Prusa printers, such as support for the PrusaMMU2S multi-material upgrade.
PrusaSlicer also offers a number of features that are not available in Cura. For example, PrusaSlicer has a built-in mesh repair tool that can fix common problems with 3D models. PrusaSlicer also has a built-in post-processing script editor, so you can customize the way your prints look after they’re finished.
So, which slicer is better? Cura or PrusaSlicer?
The truth is, both Cura and PrusaSlicer are excellent slicers. They both offer a wide range of features, and they’re both easy to use. Ultimately, the best slicer for you will depend on your individual needs and preferences.
If you’re new to 3D printing, I recommend starting with Cura. It’s easy to use and offers a wide range of features. Once you’ve gotten the hang of 3D printing, you can try out PrusaSlicer to see if you prefer its features.
Is PrusaSlicer better than Cura?
Both Cura and PrusaSlicer are excellent slicers, and the best one for you will depend on your individual needs and preferences. Cura is generally considered to be easier to use, while PrusaSlicer offers more features and customization options.
Here are some of the pros and cons of each slicer:
Cura
Pros:
Easy to use
Wide range of features
Compatible with a variety of 3D printers
Free and open-source
Cons:
Less customization options than PrusaSlicer
Some features may not be available for all 3D printers
PrusaSlicer
Pros:
More customization options than Cura
Supports a wider range of materials
Includes a built-in mesh repair tool
Developed by the Prusa Research team, who are experts in 3D printing
Cons:
More difficult to use than Cura
Some features may not be available for all 3D printers
Ultimately, the best slicer for you will depend on your individual needs and preferences. If you’re new to 3D printing, I recommend starting with Cura. It’s easy to use and offers a wide range of features. Once you’ve gotten the hang of 3D printing, you can try out PrusaSlicer to see if you prefer its features.
What software is better than Cura?
There are a number of different 3D slicers available, each with its own strengths and weaknesses. Some of the most popular alternatives to Cura include Slic3r, Simplify3D, and Repetier-Host.
It depends on what you’re looking for in a slicer. Cura is a great all-around slicer, but it’s not the only option out there. Here are a few other slicers that you might want to consider:
PrusaSlicer is another popular slicer that offers a lot of features and customization options. It’s developed by the Prusa Research team, who are experts in 3D printing.
Slic3r is a free and open-source slicer that’s been around for a long time. It’s a good option if you’re looking for a basic slicer without a lot of bells and whistles.
Simplify3D is a commercial slicer that offers a lot of features and customization options. It’s a good option if you’re looking for a powerful slicer that can handle complex prints.
Repetier-Host is a slicer and host software that gives you full control over your 3D printer. It’s a good option if you’re looking for a powerful and versatile solution.
Ultimately, the best slicer for you will depend on your individual needs and preferences. I recommend trying out a few different slicers to see which one you like best.
Can you use Cura slicer on a Prusa?
Yes, you can use Cura slicer on a Prusa. In fact, Cura is one of the most popular slicers used with Prusa printers. Cura offers a wide range of features and settings that can be used to optimize your prints for your Prusa printer.
Cura is a free and open-source slicer developed by Ultimaker. It’s one of the most popular slicers available, and for good reason. Cura is easy to use, even for beginners, and it offers a wide range of features and settings.
One of the things that makes Cura so popular is its user interface. The interface is clean and well-organized, and it’s easy to find the settings you need. Cura also has a number of helpful tutorials and guides available, so you can learn how to use it even if you’re new to 3D printing.
In terms of features, Cura offers a lot to choose from. You can adjust the print settings for everything from the layer height to the infill density. Cura also supports a variety of different 3D printer types, so you can be sure that it will work with your printer.
If you have a Prusa printer, you can download the Cura profile for your printer from the Prusa website. The profile will include settings that are optimized for your printer, so you can get the best possible prints.
Cura is a great slicer for Prusa printers. It’s easy to use, offers a wide range of features, and is supported by a large community of users. If you’re looking for a slicer for your Prusa printer, Cura is a great option.
What are the advantages of PrusaSlicer?
PrusaSlicer is a great slicer for Prusa printers. Here are some of its advantages:
It is developed by the Prusa Research team, who are experts in 3D printing. This means that the slicer is constantly being updated with new features and improvements.
PrusaSlicer offers a wide range of features and customization options. This means that you can fine-tune your prints to get the best possible results.
PrusaSlicer is easy to use, even for beginners. The interface is clean and well-organized, and it’s easy to find the settings you need.
PrusaSlicer is free and open-source. This means that you can use it without any restrictions, and you can also contribute to its development.
PrusaSlicer is supported by a large community of users. This means that there are plenty of resources available if you need help using the slicer.
Overall, PrusaSlicer is a great choice for anyone who owns a Prusa printer. It is a powerful and versatile slicer that offers a wide range of features and customization options. It is also easy to use and supported by a large community of users.
What is the difference between Cura and PrusaSlicer?
Cura and PrusaSlicer are both popular slicers for 3D printing. They have a lot in common, but there are also some key differences between the two.
Cura is developed by Ultimaker, while PrusaSlicer is developed by Prusa Research. Cura is a free and open-source slicer, while PrusaSlicer is free to use but not open-source.
Cura is generally considered to be easier to use than PrusaSlicer. The interface is more user-friendly and the settings are easier to understand. PrusaSlicer is more powerful than Cura, with more features and customization options.
Cura is compatible with a wider range of 3D printers than PrusaSlicer. PrusaSlicer is designed specifically for Prusa printers, but it can also be used with other printers.
Cura is more actively developed than PrusaSlicer. Cura gets regular updates with new features and bug fixes. PrusaSlicer is updated less frequently, but the updates are usually more substantial.
Ultimately, the best slicer for you will depend on your individual needs and preferences. If you’re looking for an easy-to-use slicer with a wide range of compatibility, Cura is a good choice. If you’re looking for a powerful slicer with a lot of features, PrusaSlicer is a good choice.
Which slicer should I use?
If you’re new to 3D printing, I recommend starting with Cura. It’s easy to use and offers a wide range of features. Once you’ve gotten the hang of 3D printing, you can try out PrusaSlicer to see if you prefer its features.
Conclusion
Cura and PrusaSlicer are both excellent slicers, and the best one for you will depend on your individual needs and preferences. If you’re new to 3D
Additive manufacturing, also known as 3D printing, is a rapidly growing field that has revolutionized the way products are manufactured. By using a computer-controlled process, parts, and products can be produced layer by layer, making it possible to produce highly complex shapes and geometries. The design of the final product is a critical component of the additive manufacturing process, and it is essential to consider various design strategies and techniques to ensure a successful outcome.
Design for Additive Manufacturing Methods
Design for additive manufacturing (DfAM) methods refer to the design techniques and strategies that are used to optimize products for production using additive manufacturing techniques. In this process, various design strategies are used to reduce material waste, improve part performance, and make the production process more efficient. The engineering design rules of additive manufacturing are an essential component of the DfAM process and help ensure that the final product is of high quality and meets all design requirements.
Additive Manufacturing Processes
There are seven main additive manufacturing processes, including Stereolithography (SLA), Fused Deposition Modeling (FDM), Selective Laser Sintering (SLS), Directed Energy Deposition (DED), Binder Jetting, Material Jetting, and Sheet Lamination. These processes differ in the type of material they use, the way the material is added, and the final result they produce.
It’s important to note that additive manufacturing and 3D printing are not the same things. While 3D printing is a specific type of additive manufacturing, it is a subset of the larger group of additive manufacturing processes.
Designing for Manufacturing
Designing for manufacturing (DfM) refers to the process of designing a product with the end manufacturing process in mind. This process involves four factors to design for manufacturing, including material selection, production processes, design complexity, and design for assembly. The five principles of design for manufacturing are used to guide the design process and ensure that the product can be manufactured efficiently and cost-effectively.
There are four main types of manufacturing methods, including batch production, flow production, job production, and continuous production. The most popular additive manufacturing method is Fused Deposition Modeling (FDM), which is a type of batch production.
Design Strategies
There are three main design strategies used in additive manufacturing, including topology optimization, generative design, and lattice structures. The four elements applied in creating a product design are form, function, aesthetics, and sustainability. The two basic types of design methodologies are form-based design and function-based design.
Engineering Design
Process The engineering design process involves seven steps, including problem definition, concept generation, concept selection, design development, testing and analysis, design optimization, and design implementation. The four engineering design process steps are: empathize, define, ideate, and prototype. There is also an eight-step engineering design process, which includes research, testing, evaluation, and implementation.
Design Principles
Design principles refer to a set of guidelines that help guide the creation of aesthetically pleasing and effective designs. These principles are based on the collective knowledge and experience of designers and are used to ensure that designs are visually appealing, communicate the intended message, and meet the needs of the target audience. The Four C’s of Design (Creativity, Context, Communication, and Collaboration) and the Four Basic Elements of Design (Line, Shape, Texture, and Color) are both important concepts in the field of design.
The Four C’s of Design refer to the key elements that designers must consider when creating a product or service.
Creativity: Refers to the ability to generate new and innovative ideas and concepts that meet the needs and requirements of the project.
Context: Refers to the surrounding circumstances or conditions that affect the design, including the intended use, cultural and social factors, and the target audience.
Communication: Refers to the ability to convey the intended message effectively through the design, including the use of visual and verbal elements.
Collaboration: Refers to the process of working together with other stakeholders, such as clients, manufacturers, and experts, to achieve a common goal.
The Four Basic Elements of Design refer to the fundamental components used to create visual compositions.
Line: Refers to the continuous mark made on a surface by a moving point. Lines can vary in length, width, direction, and texture, and can be used to create structure, movement, and emphasis in a design.
Shape: Refers to the two-dimensional areas defined by lines or borders, and can be geometric or organic. Shapes can be used to create contrast, balance, and hierarchy in a design.
Texture: Refers to the surface quality or feel of an object, and can be achieved through the use of patterns, materials, and visual elements. Texture can add depth and interest to a design, and can also convey a sense of touch.
Color: Refers to the hue, saturation, and brightness of an object or surface, and can have a significant impact on the visual appeal and emotional response of a design. Color can be used to create contrast, harmony, and mood in a design.
These elements can be used in combination to create visually appealing and effective designs that communicate the intended message and meet the needs of the target audience. The principles of design, such as balance, contrast, hierarchy, and unity, can also be applied to help guide the creation of effective designs.
Four Ms of Production
The Four M’s in Production Planning are a critical aspect of the production process and are used to ensure the successful and efficient production of a product. The Four M’s are:
Men: Refers to the people involved in the production process, including workers, managers, supervisors, and support staff. It also includes the skills and experience of these individuals and their ability to carry out the necessary tasks.
Machines: Refers to the equipment and machinery required to produce the product. This includes machine tools, assembly machines, inspection equipment, and other specialized machinery. It also includes the maintenance and upkeep of these machines to ensure they are in good working order.
Methods: Refers to the production processes and procedures used to produce the product. This includes the steps involved in the production process, the order in which they are performed, and the methods used to control the quality of the product.
Materials: Refers to the raw materials, components, and supplies required to produce the product. This includes raw materials, purchased components, packaging materials, and other supplies. It also includes the sourcing, purchasing, and management of these materials to ensure they are available when needed.
By considering the Four M’s in production planning, manufacturers can ensure that the production process is efficient and effective, and that the product is produced to the highest quality standards. This can help to reduce costs, increase productivity, and improve customer satisfaction.
DfAM Tools
One of the popular DfAM (Design for Additive Manufacturing) tools is nTopology. nTopology is a cloud-based design and engineering platform that provides a comprehensive suite of tools for optimizing and automating the design process for additive manufacturing. It helps designers and engineers to quickly create complex, high-performance parts while reducing the time and costs associated with traditional design methods.
nTopology is a software platform used for engineering and design optimization. It provides a range of tools for simulation, analysis, and optimization of products and manufacturing processes. The platform combines generative design, simulation, and high-performance computing to enable engineers and designers to quickly explore and evaluate design options, and make informed decisions about material selection, manufacturing processes, and product performance.
The software offers several features, including topology optimization, generative design, and lattice structures, allowing designers to create products that are optimized for strength, weight, and functionality. It also has a material library that allows designers to select the right material for their product, and a simulation engine that helps designers to evaluate the performance and strength of their designs.
With its user-friendly interface and powerful design tools, nTopology is a popular choice among product designers and engineers who are looking to create high-quality, optimized parts for additive manufacturing. Whether you are designing a new product or optimizing an existing one, nTopology can help you to create products that are optimized for additive manufacturing, reduce costs, and increase productivity.
nTopology Alternatives
There are several alternatives to nTopology for Design for Additive Manufacturing (DfAM) tools. Some of the popular ones include:
Autodesk Fusion 360: A cloud-based design and engineering platform that provides a comprehensive suite of tools for product design, engineering, and manufacturing.
SolidWorks: A popular 3D design software that provides tools for 3D modeling, simulation, and documentation.
ANSYS Discovery Live: A real-time simulation platform that provides interactive simulations for product design and engineering.
Onshape: A cloud-based CAD software that provides a complete design and collaboration platform for product design and engineering.
SIMULIA XFlow: A computational fluid dynamics (CFD) simulation software that provides simulation tools for design and engineering.
3D Systems Geomagic: A design and engineering software that provides tools for product design, scanning, reverse engineering, and inspection.
These are just a few of the alternatives to nTopology, and each one offers a unique set of tools and features to support the design and engineering process for additive manufacturing. When choosing a DfAM tool, it’s essential to consider your specific needs and requirements to find the best solution for your design process.
Conclusion
In conclusion, the design for additive manufacturing is a crucial aspect of the 3D printing process. Understanding the various design strategies and techniques, such as topology optimization, generative design, and lattice structures, can help ensure a successful outcome. It is essential to consider factors such as material selection, production processes, design complexity, and design for assembly when designing a product for additive manufacturing. Additionally, the engineering design process, including the seven steps and the four C’s of design, should be followed to produce a high-quality product. Finally, the four M’s in production planning – men, machines, methods, and materials – must be considered to ensure a smooth production process. With these principles and strategies in mind, designers can create products that meet all design requirements and are optimized for additive manufacturing.
Multi Jet Fusion (MJF) is a type of 3D printing technology that uses a combination of inkjet printing and heating to produce objects with high accuracy, resolution, and strength. Developed and commercialized by HP Inc., MJF technology is revolutionizing the way products are manufactured and designed. In this article, we’ll explore the details of Multi Jet Fusion, including its unique features, benefits, and applications.
What is Multi Jet Fusion (MJF) Printing?
Multi Jet Fusion (MJF) printing is a technology that uses a series of inkjet print heads to lay down small drops of a fusing agent and a detailing agent on a layer of plastic powder. The material is then melted and fused together by heat to form a solid object. Unlike other 3D printing technologies, MJF uses a combination of inkjet and thermal energy to produce parts with high precision, strong mechanical properties, and a smooth surface finish.
What Makes Multi Jet Fusion Unique?
One of the main advantages of Multi Jet Fusion is its ability to produce parts with a high level of accuracy and resolution. With a layer thickness of just 20-50 microns, MJF is capable of producing parts with fine details and sharp edges. Additionally, MJF is capable of printing large objects with a high degree of repeatability, making it ideal for applications in various industries, including aerospace, automotive, and medical.
Another unique feature of Multi Jet Fusion is its use of a special PA12 plastic powder. This material is known for its high strength and durability, making it ideal for a wide range of applications. Moreover, PA12 is a thermoplastic, which means it can be melted and reshaped multiple times without losing its mechanical properties.
Differences between Multi Jet Fusion and Selective Laser Sintering (SLS)
Selective Laser Sintering (SLS) is another popular 3D printing technology that uses a laser to fuse particles of plastic, metal, or ceramic into a solid object. While both SLS and Multi Jet Fusion produce parts with strong mechanical properties, there are some key differences between the two.
For one, SLS is limited to using only specific materials, while Multi Jet Fusion is capable of using a wide range of plastics, including PA12, which is known for its strength and durability. Additionally, MJF is capable of producing parts with a high level of accuracy and resolution, while SLS is more suited for producing large objects with complex geometries.
How much does a MJF printer cost?
The cost of a Multi Jet Fusion (MJF) printer can vary widely depending on several factors, including the size of the printer, its features and capabilities, and the vendor you purchase it from. Generally speaking, MJF printers are more expensive than entry-level Fused Deposition Modeling (FDM) printers, but less expensive than other high-end technologies such as Selective Laser Sintering (SLS) or Stereolithography (SLA).
As a rough estimate, you can expect to pay anywhere from $50,000 to $500,000 or more for a Multi Jet Fusion printer. It’s important to note that the cost of operating an MJF printer, including the cost of materials and maintenance, should also be taken into consideration when making a purchasing decision.
Multi Jet Fusion (MJF) 3D printers are commercial-grade, industrial-level machines designed to produce high-quality, high-resolution parts. There are several different models of MJF printers available on the market, each with its own unique features and capabilities.
One popular MJF printer model is the HP Jet Fusion 3D 4200, which is designed for mid-volume production and offers a large build volume of 420 x 420 x 380 mm. The HP Jet Fusion 3D 4210 is another popular model that offers similar capabilities but with a smaller build volume of 300 x 300 x 300 mm.
For large-scale production, there’s the HP Jet Fusion 3D 5200, which is capable of producing parts up to 500 x 500 x 500 mm. This machine is ideal for manufacturers who require high-volume, high-quality production capabilities.
Another popular MJF printer model is the HP Jet Fusion 3D 5600, which is designed for high-volume production and offers a build volume of 600 x 600 x 400 mm. This machine is ideal for manufacturers who require large parts and high-volume production capabilities.
In addition to these models, there are also other MJF printers available on the market, each with its own unique features and capabilities. To determine the best MJF printer for your needs, it’s a good idea to work with a vendor that specializes in 3D printing to determine the best solution for your needs and budget.
What is Multi Jet Fusion printing?
Multi Jet Fusion (MJF) printing is a type of 3D printing technology that uses a combination of heat and fusing agents to produce high-quality, high-resolution parts. It’s a powder-based technology that uses a print head to selectively melt and fuse small layers of material into a solid object.
In MJF printing, a thin layer of powder material is spread evenly across a build platform. The print head then melts and fuses specific areas of the powder, solidifying the material and building up the final object layer by layer. After each layer is fused, more powder is spread over the surface and the process is repeated until the final object is complete.
MJF printing is known for its high-quality, high-resolution parts that are comparable to injection molded parts. It’s also capable of producing parts with complex geometries, and it’s well-suited for producing large, high-volume production runs.
Overall, MJF printing is a versatile, high-performance 3D printing technology that’s ideal for a wide range of applications, including product design and development, prototyping, and end-use production.
What materials are used in multijet fusion?
Multi Jet Fusion (MJF) printing typically uses a proprietary powder material that is specifically designed for use with the technology. One of the most commonly used materials is PA12 (Polyamide 12), which is a type of thermoplastic that is known for its high strength, flexibility, and durability.
PA12 is a popular choice for MJF printing because it offers good thermal stability, making it well-suited for use in high-heat environments. It’s also resistant to abrasion and chemicals, making it ideal for applications that require high wear resistance and durability.
In addition to PA12, there are also other materials that can be used with MJF printing, including PA11 (Polyamide 11), TPU (Thermoplastic Polyurethane), and PC (Polycarbonate). These materials offer different properties and are well-suited for a variety of applications, including prototyping, product design, and end-use production.
It’s important to note that not all MJF printers are compatible with all materials, and it’s a good idea to work with a vendor that specializes in 3D printing to determine the best material for your needs and budget.
Is Multi Jet Fusion Plastic Waterproof?
Multi Jet Fusion plastic (PA12) is a thermoplastic that is resistant to water and moisture. However, it is not fully waterproof and can be affected by prolonged exposure to water or high humidity. If you need a part that is fully waterproof, you may consider using another material or adding a waterproof coating to the surface of the MJF part.
The Strongest Plastic in the World
The strength of plastic can vary greatly depending on the type of material and its application. However, some of the strongest plastics in the world include PA12 (used in Multi Jet Fusion printing), PEEK (Polyetheretherketone), and PEI (Polyetherimide). These materials are known for their high strength, durability, and resistance to heat and chemicals, making them ideal for use in various industries, including aerospace, medical, and industrial.
The Strongest 3D Printed Plastic
One of the strongest 3D printed plastics is PA12, which is used in Multi Jet Fusion printing. PA12 has a high strength-to-weight ratio and excellent mechanical properties, making it ideal for applications in industries such as aerospace, automotive, and medical. Additionally, it offers a high level of accuracy and resolution, making it possible to produce parts with fine details and sharp edges.
How Does Multi Jet Fusion Work?
Multi Jet Fusion works by using a combination of inkjet printing and heating to produce parts. The process starts with a layer of plastic powder being spread across a build platform. A series of inkjet print heads then lay down a fusing agent and a detailing agent on the powder. The material is then melted and fused together by heat to form a solid object. The process is repeated layer by layer until the entire object is complete.
What is Multi Jet Fusion Also Known As?
Multi Jet Fusion is also known as HP Multi Jet Fusion or simply HP MJF. This name reflects the fact that the technology was developed and commercialized by HP Inc.
Why is Multi Jet Fusion the Best?
Multi Jet Fusion offers several key advantages that make it one of the best 3D printing technologies available. First, it offers high accuracy and resolution, making it possible to produce parts with fine details and sharp edges. Additionally, it uses a special plastic powder (PA12) that is known for its high strength and durability, making it ideal for a wide range of applications. Finally, Multi Jet Fusion is relatively fast, making it possible to produce parts quickly and efficiently.
The cost of a Multi Jet Fusion (MJF) 3D print is determined by a variety of factors, including:
Material cost: The cost of the powder material used in MJF printing can vary depending on the specific material and the quantity used. The cost per kilogram of powder can range from $50 to $200 or more, depending on the material and vendor.
Printing time: The printing time required to produce the final object will also impact the cost of the print. Longer printing times will result in a higher cost, while shorter printing times will result in a lower cost.
Machine cost: The cost of the MJF printer will also impact the overall cost of the print. The cost of MJF printers can range from several thousand dollars to hundreds of thousands of dollars, depending on the printer model and vendor.
Post-processing: Any additional post-processing that is required, such as cleaning or polishing the final object, will also impact the cost of the print.
It’s important to work with a vendor that specializes in 3D printing to get an accurate estimate of the cost of your MJF print. They can help you determine the most cost-effective material, printing time, and post-processing options for your needs and budget.
Conclusion
Multi Jet Fusion (MJF) is a powerful and versatile 3D printing technology that offers a number of unique advantages. Whether you’re producing complex geometries, fine details, or high-strength parts, MJF is an excellent choice for a wide range of applications. If you’re interested in learning more about Multi Jet Fusion or HP 3D printing, contact us today to speak with one of our experts.
3D printing technology has revolutionized the manufacturing industry by offering a more cost-effective and efficient method of producing parts and prototypes.
3D printing is a process of creating three-dimensional objects from a digital file. The process works by adding material layer by layer until the object is complete. 3D printing can be used to create a wide variety of objects, including toys, tools, medical devices, and even food.
However, calculating the cost of a 3D print can be a complex and challenging task due to various factors such as material, design, and printing time.
The cost of a 3D print is determined by a number of factors, including:
The type of material used: The cost of 3D printing materials can vary widely, from a few dollars per kilogram to hundreds of dollars per kilogram. The most common 3D printing materials are plastics, metals, and resins.
The design of the object: The more complex the design, the more time it will take to print and the more material will be used.
The printing time: The printing time is determined by the size and complexity of the object.
The cost of the 3D printer: The cost of a 3D printer can range from a few hundred dollars to several thousand dollars.
The cost of labor: If you are having someone else print your object, you will need to factor in the cost of labor.
This article aims to provide comprehensive information on how to calculate the cost of 3D printing, including the cost per hour, per gram, and per cubic inch, as well as the cost of various 3D printing materials and methods.
In this article, I will discuss the following topics:
How to calculate the cost of 3D printing
The cost of various 3D printing materials
The cost of 3D printing services
The average price of 3D printing
Whether 3D printing is a cheap hobby or a profitable business
By using a 3D print cost calculator or 3D printing cost estimator, you can accurately estimate the cost of your next 3D printing project.
There are a number of 3D print cost calculators available online. These calculators can help you estimate the cost of your 3D print based on the type of material, the design of the object, and the printing time.
Calculating 3D Printing Cost
The cost of 3D printing is determined by several factors, including the material, design, and printing time. To accurately calculate the cost of your 3D print, you can use a 3D print cost calculator or 3D printing cost estimator. These tools take into account various factors such as the cost of the 3D printing material, the amount of material used, the printing time, and the cost of electricity.
3D Print Cost per Hour
One of the most common ways to calculate the cost of 3D printing is to determine the cost per hour of printing. This is calculated by dividing the total cost of the 3D print by the total printing time. For technologies with lower speeds, such as FDM, 3D printing pricing based on time is commonly used.
The cost per hour of a 3D printing job will vary depending on several factors, including the type of printer you’re using, the material you’re printing with, and the size and complexity of the model you’re printing. To get an accurate estimate of the cost per hour of a 3D printing job, it’s essential to use a 3D printing cost calculator that takes into account all of these factors.
Some common 3D printing cost calculators include:
Formlabs
Prusa cost calculator
Cura
Simplify3d
Using these calculators, you can input the parameters of your 3D printing job, including the material you’re using, the size of your model, and the printing speed, and receive an estimate of the total cost, including the cost per hour.
It’s important to note that the cost per hour of a 3D printing job can also be influenced by factors such as the cost of electricity, which can vary greatly depending on where you live and your local energy costs.
In conclusion, calculating the cost per hour of a 3D printing job is a crucial step in determining the total cost of a 3D print. By using a 3D printing cost calculator, you can ensure that you’re getting an accurate estimate of the cost, taking into account all the relevant factors.
3D Print Cost per Gram
Another way to calculate the cost of 3D printing is to determine the cost per gram of the 3D printing material. This is calculated by dividing the total cost of the 3D print by the total weight of the material used. The cost per gram of 3D printing material will vary depending on the type of material you use, the brand, and the vendor you purchase it from.
The pricing of 3D printing services using weight as a factor is a common method in the industry, particularly for resin-based 3D printing technologies. This method takes into consideration the amount of resin material used during the printing process and is seen as a reliable and accurate way to calculate the cost of the final print. The resin material is a key factor in determining the cost, as it is the primary resource used in the printing process, and its cost per gram can vary depending on the type and quality of the resin. Additionally, the weight of the final 3D print is used to estimate the amount of resin material that was used, and this estimate is then used to calculate the cost of the print. This approach is preferred over others as it takes into account the material used in the printing process and helps to ensure that the customer is only paying for what they receive.
One of the most significant factors in determining the cost per gram is the type of material used. Popular materials like ABS and PLA can cost anywhere from $0.05 to $0.15 per gram, while specialty materials like metal and resin can cost upwards of $10 per gram.
The size of the print also plays a role in the cost per gram. Larger prints use more material, so the cost per gram can be lower for larger prints. Printing time also affects the cost, as longer print times use more material and therefore increase the cost per gram.
To determine the cost per gram of a specific print, it’s important to use a 3D printing cost calculator. Many calculators allow you to input the type of material, the size of the print, and the printing time to estimate the cost of the print. Some popular calculators include Prusa’s price calculator, the filament cost calculator, and the 3D printing service cost calculator.
Overall, the cost per gram of 3D printing varies widely and depends on several factors. By using a cost calculator and considering the type of material, the size of the print, and the printing time, you can get a more accurate estimate of the cost of your print.
3D Print Cost per Cubic Inch/Cubic cm
Another way to calculate the cost of 3D printing is to determine the cost per cubic inch or cubic cm of the 3D printed object. This is calculated by dividing the total cost of the 3D print by the volume of the object. The cost per cubic inch or cubic cm will vary depending on the size and complexity of the object, as well as the material used.
It’s important to keep in mind that the cost of 3D printing can also be influenced by additional factors such as shipping, taxes, and any required post-processing, such as sanding or painting. To get the most accurate estimate of your 3D printing costs, it’s best to use a 3D print cost calculator or 3D printing cost estimator. Some popular options include the Prusa Cost Calculator, the Filament Cost Calculator, and the PLA Price Per Gram Calculator.
3D Print Cost Per Cubic Inch/Cubic cm of bounding box volume
A bounding box in 3D printing is a rectangular box that surrounds an object or model and defines the minimum space required to contain it. The size of the bounding box can be used to calculate the volume of material required to print an object and is often used to determine the cost of 3D printing. The bounding box dimensions are typically specified in terms of length, width, and height, and can be used to calculate the cost of printing by multiplying the volume of the box by the cost per cubic inch or cubic cm. This method of cost calculation is commonly used in powder bed 3D printing technology, where the material cost is the main factor affecting the total cost of the print.
Average Price of 3D Printing
Determining the average price of 3D printing can be challenging as there are several factors that can impact the cost, such as the type of material used, the size and complexity of the object, and the printing method. However, there are a few general rules of thumb to consider when estimating the cost of a 3D print.
For example, Fused Deposition Modeling (FDM) prints made with thermoplastics like PLA typically cost around $0.10 to $0.50 per gram.
Stereolithography (SLA) and Digital Light Processing (DLP) prints made with resin can range from $0.70 to $3 per gram.
Metal 3D printing cost anywhere from $10 to $100 per cubic centimeter, depending on the metal and printing method used.
It’s important to note that these are rough estimates and your actual 3D printing costs may vary. To get a more accurate idea of how much your print will cost, you can use a 3D printing cost calculator. These online tools allow you to input specific parameters such as the material, printing time, and object size, and they will provide you with a more detailed estimate of the cost.
3D print cost calculator excel
The use of a 3D print price calculator in excel can greatly help with the cost estimation of 3D printing projects. It is a simple spreadsheet tool that allows users to input various parameters such as the size of the print, material type, and printing time to determine the cost. This tool can be especially useful for those in the manufacturing or design industry as it helps to accurately estimate the cost of a project before committing to it. With a 3D print price calculator in excel, users can easily compare the costs of different materials and printing methods to determine which option is the most cost-effective. Furthermore, this tool can be customized to fit the specific needs of a user, such as incorporating the cost of labor, equipment, and other expenses. Having a 3D print price calculator in excel can help to streamline the process of cost estimation and ultimately lead to more informed and cost-effective 3D printing decisions.
In this video, Austen Hartley discusses how to calculate 3D print prices using Excel.
You can also download Austin’s 3D print calculator excel file.
Is 3D Printing Business Profitable?
The profitability of a 3D printing business depends on a number of factors, including:
The cost of the materials: The type and quality of materials used will affect the cost of the final product.
The cost of the 3D printer: The price of 3D printers can vary widely, from a few hundred dollars to several thousand dollars.
The cost of electricity: The amount of electricity used to power the 3D printer will also affect the cost of production.
The cost of labor: If you are hiring someone to operate the 3D printer, this will also add to the cost of production.
The selling price of the final product: The final product must be priced high enough to cover the cost of production and make a profit.
While entry-level desktop 3D printers can be relatively affordable, the cost of filament and other supplies can add up over time.
The cost of filament, the material used to create 3D prints, can vary depending on the type and quality of filament. For example, PLA filament is typically less expensive than ABS filament. Other supplies that may be needed for 3D printing include print beds, glue, and lubricants.
Additionally, high-end 3D printers and materials can be quite expensive.
High-end 3D printers can cost several thousand dollars, and the materials used in these printers can also be expensive. For example, metal 3D printing can be very expensive, as the materials used are typically very expensive.
As a result, 3D printing can be either a cheap or an expensive hobby depending on your budget and the level of investment you are willing to make.
If you are just starting out with 3D printing, it is a good idea to start with an entry-level desktop printer. This will allow you to learn the basics of 3D printing without having to invest a lot of money. Once you have gained some experience, you can decide if you want to upgrade to a more expensive printer.
However, compared to other hobbies such as woodworking or metalworking, 3D printing is relatively accessible and can provide a lot of value for your money if you’re interested in design, prototyping, or product development.
3D printing is a great way to create custom objects, prototypes, and even functional parts. It is also a relatively safe hobby, as there is no risk of injury from sharp tools or hazardous materials.
There are several ways to increase profitability in 3D printing, such as:
Reducing material waste: One way to reduce the cost of 3D printing is to reduce material waste. This can be done by using efficient slicing software and by printing parts that are designed to minimize waste.
Using cost-effective materials: Another way to increase profitability is to use cost-effective materials. There are a variety of materials available for 3D printing, and the cost of these materials can vary widely.
Streamlining production processes: By streamlining production processes, you can reduce the time and cost of producing 3D prints. This can be done by automating tasks, such as slicing and printing, and by optimizing your workflow.
Offering a unique and high-demand product: One of the best ways to increase profitability is to offer a unique and high-demand product. This will allow you to charge a premium for your products.
Ultimately, 3D printing can be a profitable business, but it requires careful consideration of costs and the market demand for the products being produced.
A 3D print cost calculator or 3D printing cost estimator can help determine the potential profitability of a particular project. It is also important to conduct market research to determine if there is a demand for the products you plan to offer.
3D printing can be a profitable business venture for those who are skilled in design, engineering, and marketing.
If you have the skills and knowledge to design and create high-quality 3D prints, and you are able to market your products effectively, then you can be successful in the 3D printing business.
Charging for a 3D Design
When it comes to charging for 3D designs, there is no set rule or formula. The price you charge for your 3D design depends on a number of factors, including:
The complexity of the design: The more complex the design, the more time and effort you will need to put into creating it, which will increase the overall cost. For example, a simple 3D model of a coffee mug might cost $50 to create, while a complex 3D model of a human heart might cost $500 or more.
The materials used: The cost of the materials used in 3D printing also affects the overall cost. Consider the cost of the filament or resin, as well as any additional materials such as support structures or other parts that may be needed. For example, a 3D model printed with ABS filament might cost $10 to print, while a 3D model printed with metal might cost $100 or more.
The time and effort: The amount of time and effort you put into a 3D design also affects the overall cost. Consider factors such as the amount of research and development time, the number of iterations you went through to get the design right, and the time spent on post-processing and finishing. For example, a 3D model that took you 10 hours to create might cost $50 to print, while a 3D model that took you 50 hours to create might cost $250 to print.
Your level of experience and expertise: Your level of experience and expertise in 3D design can also affect the price you charge. If you are a new 3D designer, you may need to charge less than a more experienced designer. However, if you have a lot of experience and expertise, you can charge more for your services.
The value of your designs: The value of your designs to your clients is also a factor to consider when pricing your services. If your designs are highly valuable to your clients, you can charge more for them. However, if your designs are not as valuable, you may need to charge less.
When pricing your 3D designs, it is important to be realistic and take into account all of these factors. You should also consider the level of competition in your field and the demand for your services. A good starting point is to research what others in your field are charging and adjust your pricing accordingly.
Here are some additional tips for pricing your 3D designs:
Be clear about your terms and conditions. This includes the number of revisions you will provide, the turnaround time, and the payment terms.
Offer discounts for bulk orders or repeat customers.
Provide value-added services, such as 3D printing or post-processing, to increase your profits.
Be flexible and willing to negotiate.
By following these tips, you can price your 3D designs competitively and make a profit from your work.
Conclusion
3D printing is a rapidly growing industry that has numerous applications and benefits. From prototyping to mass production, 3D printing has made the creation of physical objects more accessible and cost-effective. The cost of 3D printing varies depending on the size, complexity, material, and other factors. However, it’s possible to estimate the cost of a 3D print using a 3D print cost calculator or a 3D printing cost estimator.
It’s also important to consider the cost of 3D printing per hour and per gram, which can greatly affect the overall cost of a print. On average, the cost of 3D printing is around $0.10 to $0.50 per cubic centimeter, with the most affordable method being FDM (Fused Deposition Modeling).
For those who offer 3D printing services or create 3D designs, it’s important to consider factors such as the cost of materials, machine maintenance, and hourly rate to determine the right price for your work. Ultimately, 3D printing can be a profitable venture if you have the right skills, equipment, and pricing strategy.
In conclusion, 3D printing is an exciting and constantly evolving technology that has the potential to transform the way we create and produce physical objects. Whether you’re a hobbyist, manufacturer, or designer, there are numerous resources available to help you calculate the cost of 3D printing and make informed decisions about your next project.
Branding in 3D printing is as important as it sounds. In this blog post, I tried to explain different definitions and steps that could help you in branding your 3D printing service.
Also in the post How to market for 3D printing business? we talked about how to attract new customers for your 3D printing service business that we suggest you read.
What is a brand?
A brand is a combination of activities, the service you provide or produce that distinguishes you from the rest of businesses and attracts a specific target market. It includes your website design, logo, even the color of your brand, how you interact with customers, and your mission.
Why Invest in brand identity
The brand identity is what differentiates you from other companies. Your brand identity makes your brand recognizable and unique. It also makes it easier for your customers to buy your service or product as they know what makes your brand different from the others and what features and benefits it has. Defining a value for your brand and what it stands for are important advantages leading to more awareness, customer loyalty and results in more sales.
Branding Essentials
Use every opportunity to stay in your customers’ minds.
Spread your brand ideas over and over.
Understand the customer’s values and needs.
Identify the touchpoints (situations where a customer needs 3D printing service in his/her business.)
To do all these in a regulated manner, you need to educate yourself or your marketing team in different branding areas; we try to convey the most important parts of the process for a 3D Printing company in this article.
Major steps for creating your brand
Specify your target market
The first step for branding is to specify your target market: Who are you planning to provide service for? Automobile industry or medical equipment providers?
Afterward, get into more details and specify which parts of this business you aim to provide service for; e.g. if you are trying to provide service for the medical equipment industry you have to specify what is your field of expertise, is it orthopedics or dentistry, dental implant or orthopedic?
Next, determine what kind of companies are predicted to be your major target market, is it the small to medium size medical equipment companies or you are aiming for large companies?
One of the strong technics in this process is creating a persona(s) for your customer.
What is a persona?
A persona is a profile of your typical customer. This persona helps your customer managers know your possible customers’ characteristics, needs, behavior, and goals of a specific type of user and client. Since 3D printing is usually a B2B kind of business, you can create different personas of the businesses you aim to provide service for.
Pick up a proper name
Choosing a name for a brand might not seem very important at first sight, but it is one of the important elements that can make your brand stick into the minds of your audience and also depict your brand’s mission.
There are different ways you can choose a name for a 3D printing business. One new way is using AI-Powered tools that suggest names based on your preferences. One of these tools is “namelix”, click on the link to start the process:
Either using an automated tool like “namelix”, choosing it yourself, or a mix of the two, you have a few strategies in generating a brand name.
Strategies to choose a brand name
Coining: Making up a new word like Coca-cola
Use a metaphor, like Desktop Metal
Describe it literally (caution: easy to imitate), like 3D Systems
Create a new word by removing letters, adding letters, or using Latin endings, like Tumblr (Tumbler) or Activia.
Create an acronym from a longer name, like HBO
Combine two words, like Autodesk
Characteristics of a proper brand name
keep it short
A short name makes it easier for people to remember. Most successful brands have short names. This is the same with 3D printing with we are living in a branded world and it is harder than ever to keep a long name in mind.
Be original
Originality is one of the important factors in choosing a brand name. Search before finalizing your brand name and make sure it does not represent other brands or services.
Make sure it’s easy to spell
Spelling is another important factor for choosing a name. Avoid using names that can be written in different ways or are not written the way they are pronounced; these spelling complications will have negative effects on your website or socialƒvoxejl media views. For e.g. “materialise” which is a very well-known brand in the field of 3D printing service is mistakenly written as “materialize” by many clients.
Doesn’t restrict growth
Choose a name that does not restrict you so you have to change it later. A good example for this is 3dhubs which later had to omit “3D” from the beginning of its brand and now the brand name is simply “hubs”.
Easy to pronounce
Say the word loud to see if it is easy to pronounce.
Your chosen name should sound good on the phone or in verbal conversations. In addition, if you are planning to build an international brand, find out if you can pronounce the name you have chosen in other languages as well. Voxeljet is a very successful additive manufacturing service provider, but the pronunciation of the brand name might seem difficult for people other than Germany/North Europe.
Memorable
Choose a name that is memorable and easy to remember.
Related to the service you provide
Think about famous brands in 3D printing including materialise, proto labs ( leaving an impression for prototypes)., etc. They all leave an impression on 3D printing in their own way. It is better than the name you choose is related to the 3D printing service.
One of the things that help you pick up the right name for your brand is creating a list of the names you have in mind and giving scores for each item on a scale of 1 to 10. Then you can choose the ones which have the highest rate and decide more easily. Below is a sample list that follows this pattern for choosing a name.
Create your slogan
A slogan is a short descriptive statement that is catchy and leaves a strong impression. Slogans can communicate your values, your mission, and they can also be used in advertisement and marketing. There are different characteristics that a good slogan must have :
Well-remembered and short: The slogan you use should be as short as possible and easy to remember. Avoid using complicated statements the more simple it is the more it will be remembered.
Catchy: You probably know about the importance of an eye-catching slogan, take your time and choose a catchy one.
Eccentric: The name you choose should be unique in terms of selling your product. It does not necessarily mean nobody has ever used it before it is more about paying attention to what makes you different from other 3D printing services. The speed or accuracy of the 3D printing service you offer can be mentioned in your slogan.
Addressing your target market: You should always have your target audience in mind, write your slogan while taking the audience’s needs in mind. E.g, if you are working more with the airplane industry the accuracy of the prints is very important so you can mention it in your slogan.
Choose a color for your brand
Each and every color evokes different emotions. It also tells a lot about your brand’s personality.The brain reads the color after shape and before the content and it is instantly stimulated by that. In order to choose a suitable color, you should know color theory and what message or feeling each color has and and what “you” want to convey to your customers.
Color psychology
Researchers found out each color has different effects on people’s moods, feelings, and behaviors. Although your feelings are mostly personal and affected by your personal experience and culture, below are some of the connations that each color give to a large number of people and what they are colors are known for.
Black
Positive connotations: Elegance, attractiveness and sophistication.
Negative connotations: Aggression, fear, and despair.
Red
Positive connotations: Excitement and Energy, passion, desire, power
There are many other colors you can use naturally; regarding the formal essence of additive manufacturing these colors are used more by fellow brands.However, it is always up to you, and sometimes a less common color sticks in the customer’s mind because of its uniqueness and vibrant entity.
Questions to ask yourself before choosing the color
Does the color have positive connotations in the target markets?
Any color has a different connotation in different contexts and countries and cultures. It might seem impossible to literally have everyone and each country in mind, but paying attention to your major target audience’s needs can help you a lot in choosing the right one.
Did you consider a formulated color?
Is it in line with your strategies?
Is it challenging to get the right color?
Have you tested that on different monitors PCs and Mac?
Have you developed both a web palette and a print palette?
Can they be reproduced?
Design a logo
“The logo is the gateway to the brand.” Milton Glaser, Designer.
Your brand logo matters a lot, you can recruit a professional graphic designer or use different platforms which offer you AI-powered logo designs. Your brand logo tells a lot about your brand; designers try to process meaning into visual form and expression and impress the audience and also convey the brand’s message to the customers. Note that these messages should be explained so they could be understood.
Characteristics of suitable 3D printing brand logo
The right shape
Choosing the right shape is very important, certain emotions are evoked by certain shapes. A triangle lives a different impression from a rectangle; so choose the right shape based on the feeling you want to give to the possible customers. For 3D printing business note that many 3D printing brands such as 3D Systems and Voxeljet brought the 3D entity of their business into their logo designs by adding 3D cubes in their logos.
The right color
In the last section about colors, the basics of color theory and its effect on customers were discussed. Here, you have to take it into account when designing your logo. Light or navy blue-black and green are the dominant colors used in 3D printing brand logos.
The right typography
The way texts look affects the customers’ perception of your brand. Typography contains all the visual choices of the name including font, size, boldness the writing format, etc. Most 3D printing companies have medium-sized non-cursive typographies.
The right tone
It is important to set the tone of your brand before launching your logo. You can see how the logo brand for M&Ms is different from The Guardian newspaper. M&M uses a mascot while guardian’s design is minimal and formal. Regarding the fact that in 3D printing business you mostly offer a b2b service , the tone is usually formal and the logo designs are suggested to be minimal.
Take social media and online platforms seriously
Now that you created your brand and defined your mission, you should launch it on social media. Online platforms and social media have dramatically altered branding in recent years; the customers are now active participants in brand building with “sharing”, tagging, etc; this way, they remain active in the process. Moreover, the pandemic deprived many people and businesses to market their brand other methods like meeting and reaching their probable customers through exhibitions and seminars, so the role of social media has increased even more.You can use many platforms. Contacting and staying with your possible customers is an important step of your 3D printing branding pathway. There are platforms like LinkedIn, Pinterest, YouTube, Twitter, Instagram, meetup(meetup.com),etc. in which you can share your designs, products, and videos and there is also a platform which is exclusively designed for 3D printing businesses named treatstock (www.treatstock.com)
3D printing service Touchpoints
Brand touch is interactions that a customer has with a brand. Note that each touchpoint is a brand experience so enhancing touchpoints results in a better brand experience.
These touchpoints include Websites, blogs, news releases, FAQs, Call centers, Sales, youtube videos, presentations, announcements, emails advertising, and packaging which are all very important in a 3D printing service.
pre- and post-sale touchpoints
The pre-touch points are touchpoints before you make the sales and post-sales are touchpoints after you make the sales. Below is a table showing touchpoints in different parts of making sales.
Packaging
Packaging is one of the important touchpoints especially in a 3D printing service; probably most of your clients printed objects are packed and sent to them. These packages also mean that this is the brand that the customer trusted enough to bring to their address. The packaging shapes, box sizes, graphics, and colors comfort and persuade customers if they made the right decision.
Brand voice
Brand voice is the personality of your brand, the way you communicate with your customers, the language you use, etc. in order to create a memorable experience. Your brand voice makes you distinctive and different from your competitors. Invest in your brand voice and keep it consistent throughout your branding.
Now you know enough about 3D printing branding and the steps you have to take. Remember that 3D printing business is a growing market and you can expect a rising profit in the upcoming years. Good luck and enjoy the business!
Making money from 3D printing might seem challenging but if you are persistent and you know enough about the business there is room for you as a 3D printing businessperson. Whether you are a beginner or you want to maintain your 3D printing business, below are some tips that might be suitable for you. First, let’s talk about some necessary tips that might help you if you are new in the business and just want to get started.
Learn as much as you can
It is always important to have enough knowledge in 3D printing, materials, and designs. Learn as much as you can about 3D printing and about starting a business. It is also a good idea to spend some time working in the industry before starting up your business.
Create a website
Don’t forget to create a website. WordPress enables you to build your website easily with available templates. You can add different plugins as well, which are proper and designed for 3D printing services. Here, you can read about different plugins and templates suitable for 3D printing.
Most people who use 3D printing services will ask for the design as well. You can either recruit a full-time designer or decide to work with freelancers. There are different websites in which you can choose to work with freelancers one of the most known websites is freelancer.com
first, you have to decide what kind of design service you are looking for, product designer, 3D modeling, or sketching designer. Then you can interact with them and start working with them and offer design services to your clients.
Branding in 3D printing
Branding in 3D printing is basically the same as branding any other business. There are some other things you should take into account for 3D printing.
First of all, you should know what a brand is. A brand is a combination of activities, the service you provide or produce that distinguishes you from the rest of businesses and attracts a specific target market. It includes your website design, logo, even the color of your brand to how you interact with customers and your mission. You should create your brand and specify your mission.
Content Marketing in 3D printing
Content marketing is a strategy in which you can attract viewers to your website and make sales. You can attract clients through the content you create. First of all, you should know about SEO and content marketing if you want to be noticed in digital media.
SEO for 3D printing services
SEO stands for Search Engine Optimisation. The goal is always to be the first result on google’s first page. To reach this goal you have to build a strategy and create your content thoughtfully to appear on the first page for your intended keywords and phrases.
There are different formats of content providing:
Infographics
Most 3D printing service customers are confused about manufacturing technologies and materials. Infographics help you provide your customers with concise and useful information about materials.
You can show statistics and graphs that might be useful for your customers in their area. Providing your customers with a graph of different topics such as “the growth of 3D printing in the last 5 years in medical equipment and implants” can help them get an instant overview. This type of content is easy to view so it is viewed more as well.
Videos and podcasts
Video content can be an amazing tool to help you get noticed more. They can be promotional o educational. You can create different videos whether it is educating people on the field of 3D printing or giving information about your company, its history, and the service it gives. You can also hold webinars and share the story of different customers who reached a certain goal in their own business or how your service helped their business enhance and get better. There are many platforms in which you can share these video content from your own website to youtube and social media from Instagram and Linkedin and Twitter.
Podcasts are growing more and more each day, there are different apps for podcasts such as Castbox and Spotify in which you can share information. This podcast can be the written content of for e.g. your blog posts or white papers customized for podcasts or interviews with a specialist in the additive manufacturing business.
Generating Knowlagebase for 3d printing service
Knowledge bases are self-serve online libraries of information about a product, service, department, or topic. 3D printing is almost a new industry so many of your clients probably do not know about the different technologies and materials and 3D printing in general; creating a knowledge base about the service you provide alongside the technology and material you use can be very helpful for both attracting customers and receiving fewer calls in your call center.
Use social media for your 3D Printing service
Social media is an important tool for the 3D printing business. The importance and basics of content marketing are explained in the last part. Social media is important for you to promote your brand. Social posts make your brand fresh for your customers. Also, You can use the paid ads in the platform and stay active in these platforms to attract the maximum clients and be noticed.
You can share photos of your designs or any other object you created or printed. Then promote them via social media, the web, and YouTube. It is always a good idea to get feedback from people and gain some reputation on different online platforms.
Customer Testimonial
3D printing business is mostly regarded as a B2B business; so you have to provide the 3D printers with a service used in their own business. B2B businesses have their own way of marketing and since most of your marketing strategy should be designed for this type, it is important to use testimonials which proved to be an effective method.
A testimonial is a piece of writing from your customers, mostly. They can share their experience of working with you. Keep in mind that it is best t shoot them in video format as it is more effective, you can share it on social media and YouTube, or your own website. Also, keep it short (around 30 seconds to a maxim of one minute) and real. Avoid exaggeration and making up unreal stories.
These customer testimonials can be shared as videos or blog posts on your website or social media platform.
Lead generation for 3d printing services
Lead generation means attracting customers and getting their contact information to make sales. After creating your brand and creating content, potential customers will reach your website;
You should encourage your customers to leave their contact information for you. You can do this when you are sharing an educational white papers or giving them price quotations or simply when they visit the website. After getting the customer’s contact information you should note that you should choose the best time to contact and reach them and contact them when they’re ready.
Focus on your niche
When you are engaged in the business for quite a long time, you can get to know what you’re better at, we call this a niche in business. You can work in this field and spend most of your time in that area of expertise.
Conversion Funnel in 3D printing service
A conversion funnel is a term used in commerce which means different stages in a customer’s journey which lead to purchasing the product or service.
This term comprises three stages including “upper funnel”, “middle funnel”, and “lower funnel”. Observing and knowing each stage can help you increase your sales.
“Top of the funnel” or “Upper funnel” is a user that starts to look for a product without having a specific background of the exact needs of the product. In this stage, the customer searches different brands in order to find the most suitable one.
“Middle Funnel”: In this stage, users provide the brands with their contact information to know more about the product or brand.
“Bottom of the Funnel” or “Lower Funnel”: In this stage users have chosen their favorite brand and they look for information on their purchase. In this stage of re-marketing, techniques can help you sell your product or service.
One of the most important tasks for you as a 3D printing service marketer is to increase your users’ conversion rate which is very complicated. What percentage of those who uploaded the file registered the order? What percentage of those who placed the order returned and placed the order again? And questions like that.
Layers marketing tools help you measure your 3d printing service conversion rates.
Buy the right printer
Buying a printer is one of the most important things in a 3D printing service. Printing quality not only depends on your skills but also it is on the printer you use; so purchase the right printer for your business. You should first decide on the technology you want to use.
Tips on scaling up your 3D printing service business
Offer more technology and materials
There are various technologies that you can choose from. Buying and adding new technology and materials can be a good idea. Adding new technologies means buying a new printer so maybe it is better to think twice and look for less expensive methods to expand your business.
Work with more workshops
Working with more workshops enables you to offer a wider range of technology. Selling a 3D printing service as a broker can be a suitable substitute for expanding your business but not necessarily by buying new printers.
Purchase suitable software
There is some software that can help you in the 3D printing business in different ways: in this blog post, you can read about these softwares:
Many clients look for getting a price quotation when ordering a product to be printed. Adding an instant quotation service can boost your business and create more satisfaction for your clients.
Providing service for other countries
Using the digitalization of the current era, it is possible for you to provide service for countries other than yours to increase sales. You can determine countries for which you can provide service and expand your business this way.